Double Entry Integrational Entry Integration
Discover the power of double-entry integration in accounting to ensure precise and error-free financial transactions. Improve accuracy today!

Introduction
The Double Entry Add-On is a helpful tool that makes accounting easier by keeping track of all your transactions and automatically updating your financial reports. It works alongside the Accounting Add-On and helps you generate important documents like the Ledger Summary, Trial Balance, Balance Sheet, and Profit & Loss Statement. Whenever you make sales, purchases, payments, or payroll, the add-on records these automatically, so you don’t have to worry about manual entries. It also works with other business areas like invoicing, stock management, retainer payments, and commissions, making sure your accounts stay balanced and your financial information stays accurate.
How to enable this module
To Set Up the Double Entry Add-On, you can follow this link: Setup Add-On.
How to use the Double Entry Add-On?
Note: This Add-On is built on top of the Accounting Add-On. Please ensure the Accounting Add-On is enabled before using the Double Entry Add-On.
Ledger Summary
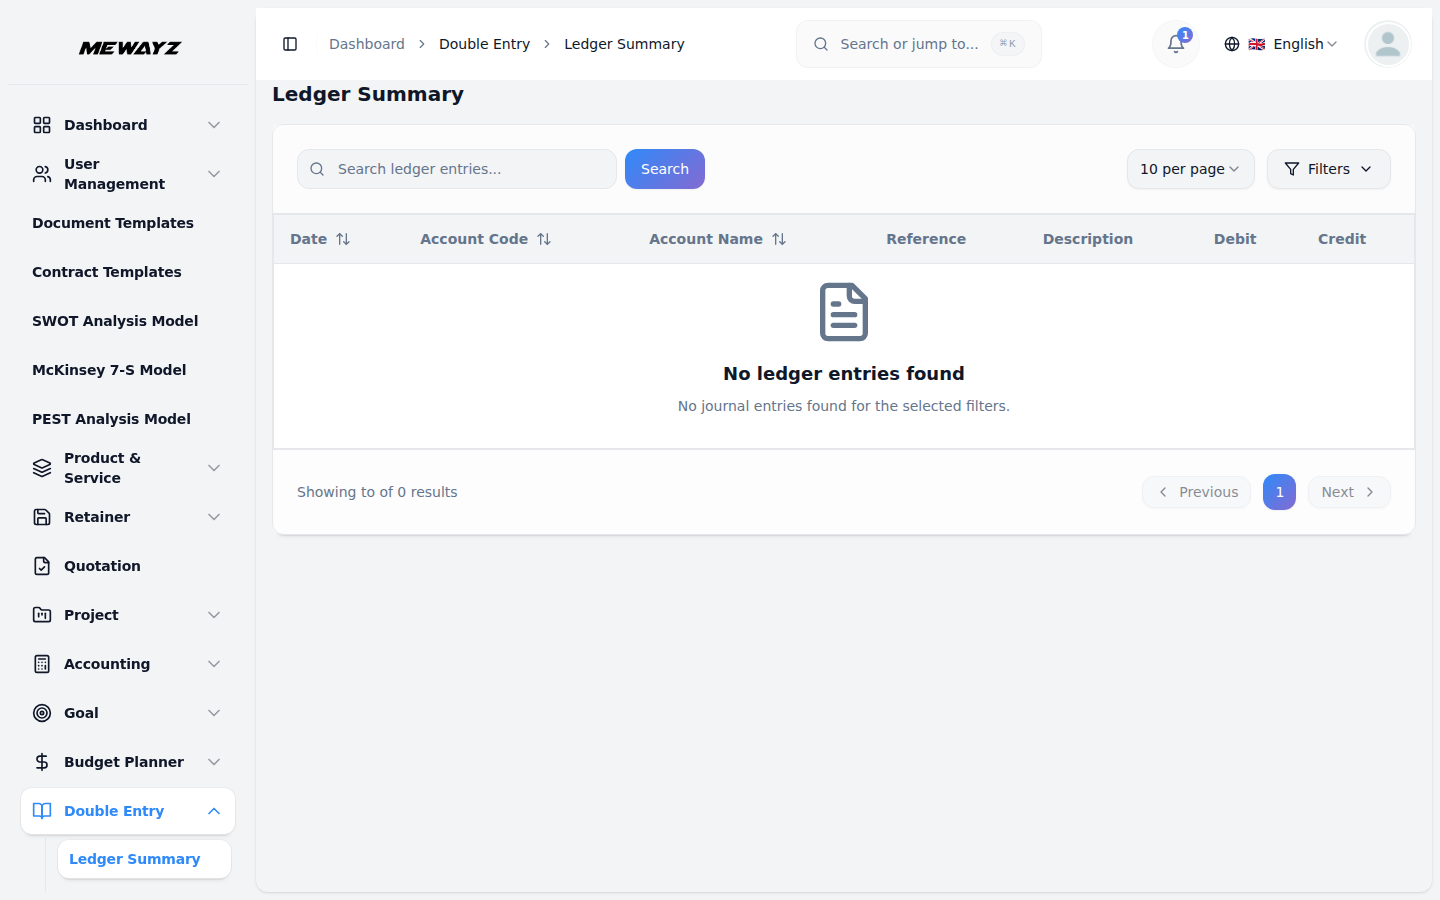
- The Ledger Summary Report provides a concise overview of all ledger accounts, summarising their transactions with debits and credits over a selected date range. This helps users understand account movements and balances at a glance.
- On the Ledger Summary page, you’ll find a complete view of all your account ledgers, including their transaction histories and balances.
- At the top of the page, there is a search bar where you can search for specific ledger entries by typing account code, name, or description.
- There is also an option of filtering, where you can select a specific account from the dropdown, and choose a date range using the “From Date” and “To Date” fields. After selecting your filters, click the “Apply” button to view the filtered results.
- You can easily clear all filters by clicking the “Clear” button to view all ledger entries again.
- The ledger summary displays all posted journal entries in a table format, showing the Date, Account Code, Account Name, Reference, Description, Debit amount, and Credit amount for each transaction.
- This page also allows you to download the ledger data as a PDF or print it directly, which can be useful for audits, reviews, or offline records. Simply click the “Download PDF” or print icon button at the top right.
Trial Balance
- The Trial Balance report compiles the ending balances of all the accounts to ensure that total debits equal total credits. It includes data from all transactions such as invoices, bills, payments, revenue entries, Vendor Payment, and Bank Transfer, etc…
- The trial balance data is automatically generated from all your business transactions across all add-ons that are connected with the Account system.
- When you create invoices, record payments, make purchases, or perform any financial transaction in connected add-ons, journal entries are automatically created in the background.
- The trial balance pulls data from these automatically generated journal entries and displays the current balances of all your accounts.
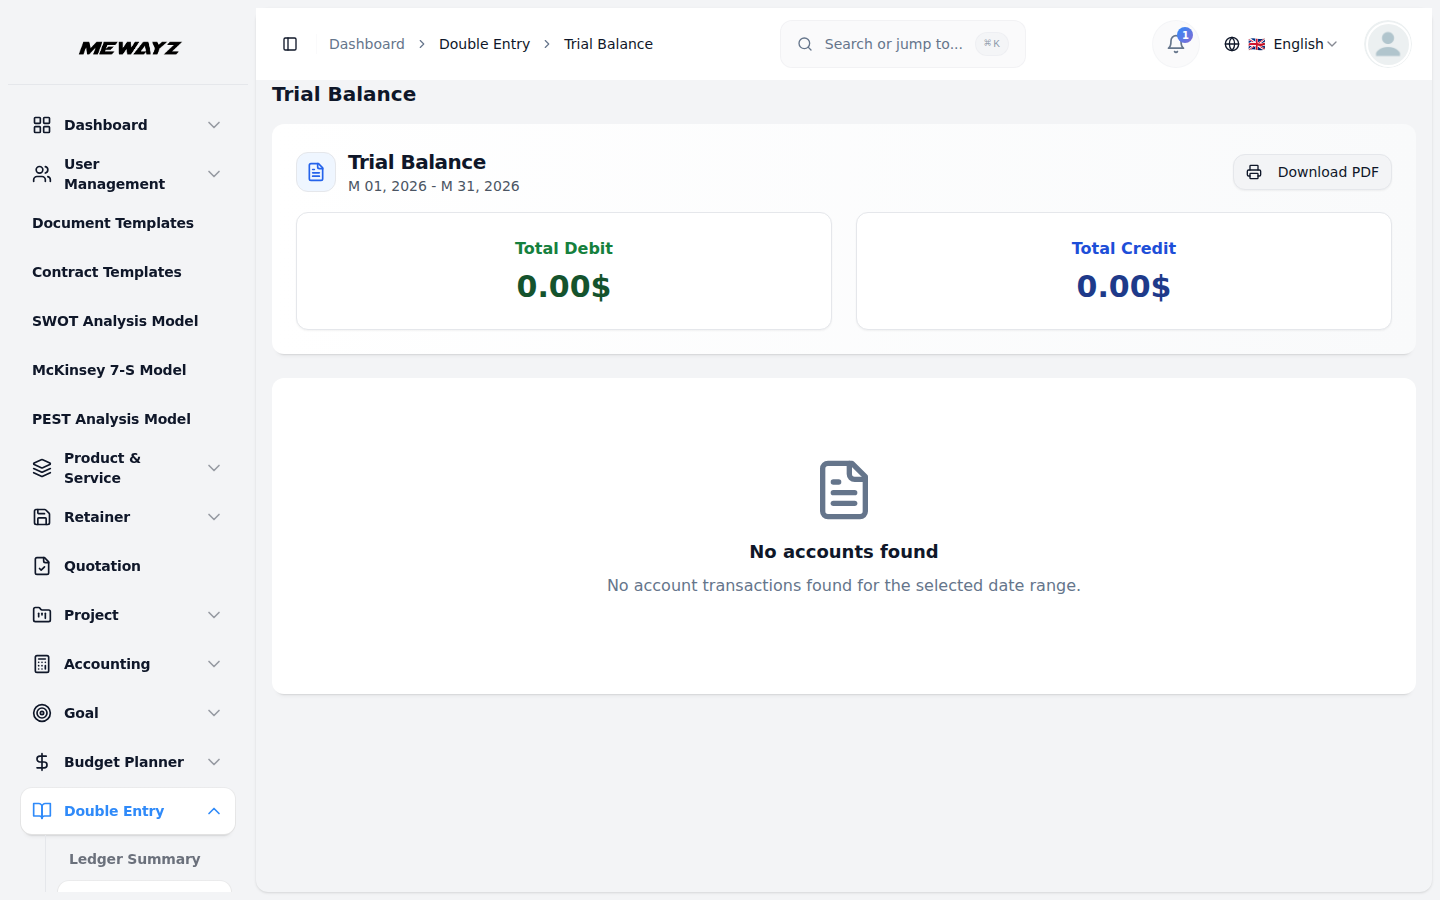
- In the Trial Balance section, you can view a consolidated list of all your account balances, ensuring that total debits match total credits.
- At the top of the page, you can select the date range for which you want to generate the trial balance using the “From Date” and “To Date” fields. Once you’ve selected your dates, click the “Generate” button to create the report.
- The page displays two summary cards showing the Total Debit and Total Credit amounts prominently. When your books are balanced, these two amounts will be equal, confirming the accuracy of your financial records.
- Below the summary cards, the trial balance displays all accounts in a table format with four columns: Account Code, Account Name, Debit, and Credit. Each account shows its current balance in either the debit or credit column.
- At the bottom of the table, you’ll see the TOTAL row, which sums up all debit and credit amounts. This is where you can quickly verify that your total debits equal total credits, confirming your books are balanced.
- Like other sections, this report can be downloaded as a PDF or printed for documentation or reviewed periodically to maintain financial accuracy. Simply click the “Download PDF” or print icon button at the top right.
Balance Sheet
- When you open the Balance Sheets page, you’ll see the balance sheet for the most recent period. To generate a new balance sheet, simply click the “Generate Balance Sheet” button at the top right corner.
- First, select the balance sheet date. And Add a Financial Year. This is the date for which you want to see your financial position (like month-end or year-end).
- Below, this details you’ll see a section called “How it works” that explains what the system will do when generating the balance sheet.
- In the How it works section, you’ll see the details, like the system will calculate balances for all accounts up to the selected date. Accounts will be automatically sorted into Assets, Liabilities, and Equity.
- The system will check that your balance sheet is balanced (Assets = Liabilities + Equity). You can review and finalise the balance sheet after generation. Click the “Generate” button to create the balance sheet.
- After you click Generate, you’ll see the balance sheet details page. At the top, there are three matrix cards showing your Total Assets, Total Liabilities, and Total Equity.
- Below these boxes, you’ll see the complete balance sheet divided into two sides: “Liabilities & Equity” on the left and “Assets” on the right.
- On the Assets side, accounts are grouped into categories like Current Assets (cash, accounts receivable, inventory), Other Assets (like tax receivable), and Fixed Assets (equipment, buildings). Each account shows its code number and current balance.
- On the Liabilities & Equity side, you’ll see Current Liabilities (accounts payable, taxes owed), Long-term Liabilities (long-term loans), and Equity (retained earnings). Each shows its code number and balance.
- At the top of the balance sheet, there’s a date dropdown. If you have multiple balance sheets, you can click this to switch between different dates.
- At the top, you’ll find several action buttons, including “Add Note,” which allows you to add a note by entering the note title or content, or simply by clicking the “Add Note” button.
- “Compare,” which allows you to select a balance sheet from the dropdown and compare it with another, but this option is only available if both balance sheets are finalized. “Download PDF,” which enables you to download the balance sheet as a PDF file; and “Finalise,” which changes the status from draft to final when clicked.
- On the right side, you can see two status badges: one shows if the balance sheet is balanced, and another shows if it’s in draft or finalised status.
- When a balance sheet is in Draft status, you can make changes, add notes, or delete it. Once you click Finalise, it becomes permanent, and you cannot change or delete it anymore.
- A finalised balance sheet is your official record. You can use finalised balance sheets to compare different time periods.
- At the top right corner, you’ll find the “All Balance Sheets” button. Clicking it will take you to a comprehensive list of all your previously created balance sheets. Each row displays the date, financial year, total assets, total liabilities, total equity, balance status (Yes/No), the current status (Draft/Finalised), and available action buttons.
- In the list page at the top, there’s a search box where you can search by financial year. Next to it, there’s a filter dropdown to filter by status. After selecting your filter, click “Apply” to see the results or “Clear” to remove the filter.
- Available actions you can use view to see the balance sheet, download pdf to download the balance sheet file as a PDF, or finalise to convert the draft status into the finalised, or delete to remove the existing balance sheet record.
- By clicking the “View Comparisons” button, you’ll be directed to the Balance Sheet Comparisons page, where the system displays your entire comparison history in an easily accessible, clickable format.
- Next, click the Year-End Close button to end your financial year and close your books. You will need to enter the financial year you wish to close and select the closing date.
- Below the details, you’ll find an important warning stating that this action will close all revenue and expense accounts, transfer your profit or loss to retained earnings, create opening balances for the next year, and cannot be undone; click the Close Year button to complete the year-end closing.
- After year-end close finishes, the system automatically handles all the closing processes and sets up the new year.
- Important: You can only close each financial year once, and you cannot undo it. Make sure all your transactions for the year are entered and correct before closing.
- During the year-end close, the system first checks if the year has already been closed to avoid any mistakes. Then, it reviews your income and expense accounts to see their balances.
- It generates a special journal entry that resets all income and expense accounts to zero, carries them forward to the new year, and transfers the profit or loss into the Retained Earnings account.
- After posting this entry, the system calculates the opening balances for the new year based on where your accounts ended, creating new records for all your balance sheet accounts, like assets, liabilities, and equity. Finally, it updates your chart of accounts with these new balances, ensuring everything is ready for the start of the new financial year.
- Choose toggle between Horizontal and Vertical view to see the balance sheet in different formats.
Profit & Loss Statement
- The Profit & Loss section provides a detailed breakdown of your income and expenses over a chosen period, helping you understand your net profit or loss.
- The profit and loss data is automatically generated from all your business transactions across all add-ons that are connected with the Account system. When you create invoices, record sales, pay bills, or record expenses, journal entries are automatically created in the background. The profit and loss statement uses these entries to show your financial performance.
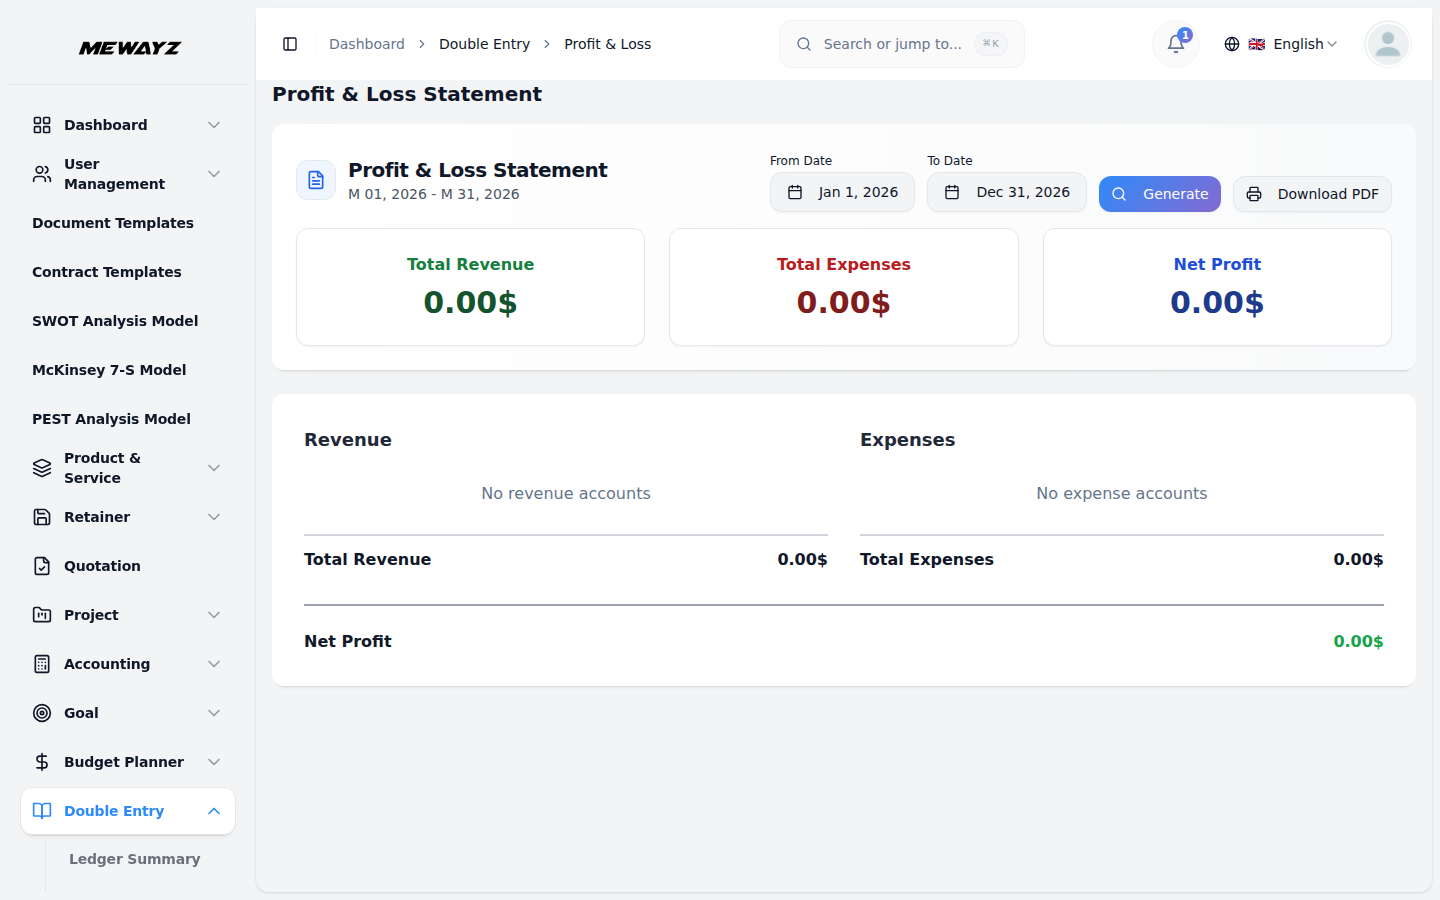
- On the Profit & Loss page, the date range is displayed at the top, where you can select the “From Date” and “To Date” to generate reports. You can generate reports for any period: a week, month, quarter, or full year.
- The page displays three summary cards showing the Total Revenue, Total Expenses, and Net Profit. You can see the “net profit” or “net loss” easily; the amount will be calculated automatically.
- Below the summary cards, the report is divided into two sections: “Revenue” on the left and “Expenses” on the right.
- The Revenue section lists all your income accounts, showing how much money you earned from each source during the selected period. At the bottom, you’ll see “Total Revenue,” which sums up all income.
- The Expenses section lists all your expense accounts, showing how much money you spent in each category during the selected period. At the bottom, you’ll see “Total Expenses,” which sums up all spending.
- At the very bottom of the report, you’ll see “Net Profit,” which is calculated as: Total Revenue minus Total Expenses. If expenses are higher than revenue, you’ll see a “Net Loss”.
- You also have the option to download the report as a PDF or print it directly. Simply click the “Download PDF” or print icon button at the top right.
Reports
- In the Report section, you can see detailed reports of your business transactions and account activities.
- On the Reports page, there are six tabs at the top: Journal Entry, General Ledger, Account Statement, Account Balance, Cash Flow, and Expense Report. You can click on any tab to switch between different reports.
- On each report page, there is a filtering option where you can select the date range using the “From Date” and “To Date” fields. Some reports also have additional filters like status or account type.
- After selecting your filters, click the “Generate” button to display the report. You can click “Clear” to remove all filters.
- You can download any report as a PDF or print it directly using the buttons at the top right.
- The Journal Entry Report displays all journal entries with Journal, Date, Reference, Description, Total Debit, Total Credit, and Status, allowing filtering by status (Posted, Draft, or All Status), and includes expandable details for each entry showing Account Code, Account Name, Description, Debit, and Credit amounts.
- The General Ledger Report displays all transactions for a specific account, including dates, descriptions, debit/credit amounts, and running balance, with options to select the account and date range for the report.
- The Account Statement Report is similar to the General Ledger but formatted as a statement, making it useful for account reconciliation.
- The Account Balance Report shows the current balances of all accounts as of a specific date, with options to filter by account type (Assets, Liabilities, Equity, Revenue, Expenses), show or hide zero balances, and display subtotals by account type along with a Grand Total at the bottom.
- The Cash Flow Report shows cash movements for a selected period, highlighting Beginning Cash, Net Cash Flow, and Ending Cash, with sections for Operating, Investing, and Financing Activities, and a Net Increase/Decrease in Cash at the bottom.
- The Expense Report lists all expense accounts with amounts sorted from highest to lowest, showing Total Expenses at the bottom, and includes data only from posted journal entries, excluding draft entries.
Below is the Chart of Accounts, which explains how it should be used:
The add-on uses standard account code ranges:
| Account Code Range | Account Type | Financial Statement Section |
|---|---|---|
| 1000–1399 | Current Assets | Assets |
| 1400–1599 | Other Assets | Assets |
| 1600–1999 | Fixed Assets | Assets |
| 2000–2499 | Current Liabilities | Liabilities |
| 2500–2999 | Long-term Liabilities | Liabilities |
| 3000–3999 | Equity | Equity |
| 4000–4999 | Revenue | Income Statement Only |
| 5000–5999 | Expenses | Income Statement Only |
| Account Code | Account Name | Type | Typical Use Case |
|---|---|---|---|
| 1000-1999 ASSETS | |||
| 1005 | Petty Cash | Assets | Petty cash fund |
| 1100 | Accounts Receivable | Assets | Customer invoices owed |
| 1200 | Inventory | Asset | Stock/inventory balance |
| 1500 | Tax Receivable | Asset | Recoverable input VAT/taxes |
| 2000-2999 LIABILITIES | |||
| 2000 | Accounts Payable | Liability | Vendor invoices owed |
| 2210 | VAT Payable | Liability | Output VAT collected |
| 2350 | Customer Deposits | Liability | Retainer/advance payments |
| 2400 | Payroll Liabilities | Liability | Employee commission owed |
| 4000-4999 REVENUE | |||
| 4100 | Sales Revenue | Revenue | Product sales |
| 4200 | Service Revenue | Revenue | Service income |
| 4300 | Other Income | Revenue | Miscellaneous income |
| 5000-5999 EXPENSES | |||
| 5100 | Cost of Goods Sold | Expense | Inventory cost of sales |
| 5200 | Salaries Expense | Expense | Employee payroll |
| 5220 | Sales Commission Expense | Expense | Agent commissions |
| 5305 | Dairy Cattle Expense | Expense | Dairy operations |
| 5306 | Catering Expense | Expense | Catering costs |
| 5310 | Office Supplies | Expense | Office materials (legal) |
| 5330 | Travel | Expense | Travel expenses (legal) |
| 5420 | Professional Fees | Expense | Legal/professional costs |
| 5430 | Depreciation Expense | Expense | Warranty repairs |
| 5510 | Bank Charges | Expense | Transfer fees |
| 5800 | Miscellaneous Expense | Expense | Fleet, laundry, legal misc |
| Account Code | Account Name |
|---|---|
| 1005 | Petty Cash |
| 1010 | Bank Account – Main |
| 1100 | Accounts Receivable |
| 1200 | Inventory |
| 1500 | Tax Receivable |
| 2000 | Accounts Payable |
| 2210 | VAT Payable |
| 2350 | Customer Deposits |
| 2400 | Payroll Liabilities |
| 3200 | Retained Earnings |
| 4100 | Sales Revenue |
| 4200 | Service Revenue |
| 4300 | Other Income |
| 5100 | Cost of Goods Sold |
| 5200 | Salaries Expense |
| 5220 | Sales Commission Expense |
| 5305 | Dairy Cattle Expense |
| 5306 | Catering Expense |
| 5310 | Office Supplies |
| 5330 | Travel Expense |
| 5420 | Professional Fees |
| 5430 | Depreciation Expense |
| 5510 | Bank Charges |
| 5800 | Miscellaneous Expense |
General
- Purchase Invoice
- Purchase Returns Invoice
- Sales Invoice
- Sales Returns Invoice
- Warehouse Stock Transfer
Account
- Vendor Payment
- Customer Payment
- Credit Note
- Debit Note
- Bank Transfer
HRM
- Pay Salary
Retainer
- Retainer Payment
- Retainer to Sales Invoice
Petty Cash Management
- Petty Cash
POS
- POS Order
Sales Agent
- Commission Payment
- Commission Adjustment
Legal Case Management
- Case Expense
- Fee Receive
Hotel Room Management
- Room Booking Payment
Commission
- Commission Payment
Beauty Spa Management
- Booking
Fleet
- Fleet Booking
- Fleet Expense
Catering Management
- Catering Order
- Catering Expense
Dairy & Cattle Management
- Payment
- Expense Tracking
Gym Management
- Membership Plan Payment
Parking Management
- Parking Booking Payment
Vehicle Inspection Management
- Vehicle Booking Payment
Laundry Management
- Laundry Payment
- Laundry Expense
Medical Lab Management
- Medical Order Payment
Warranty
- Warranty Claim
Events Management
- Event Booking Payment